Continuous Integration
Specmatic is a platform and programming language independent executable. We can run it in all CI environments through the command line interface.
Objective of this tutorial
By the end of this tutorial, you'll have CI Pipeline running Specmatic on your:
- Central contract repository
- API providers
- API consumers
Let's get started!
Architecture Overview
In this tutorial, we'll be working with a typical scenario of microservices & micro-frontends involving a Backend-for-Frontend (BFF) and a Domain Service. Here's an overview of what we'll be setting up:
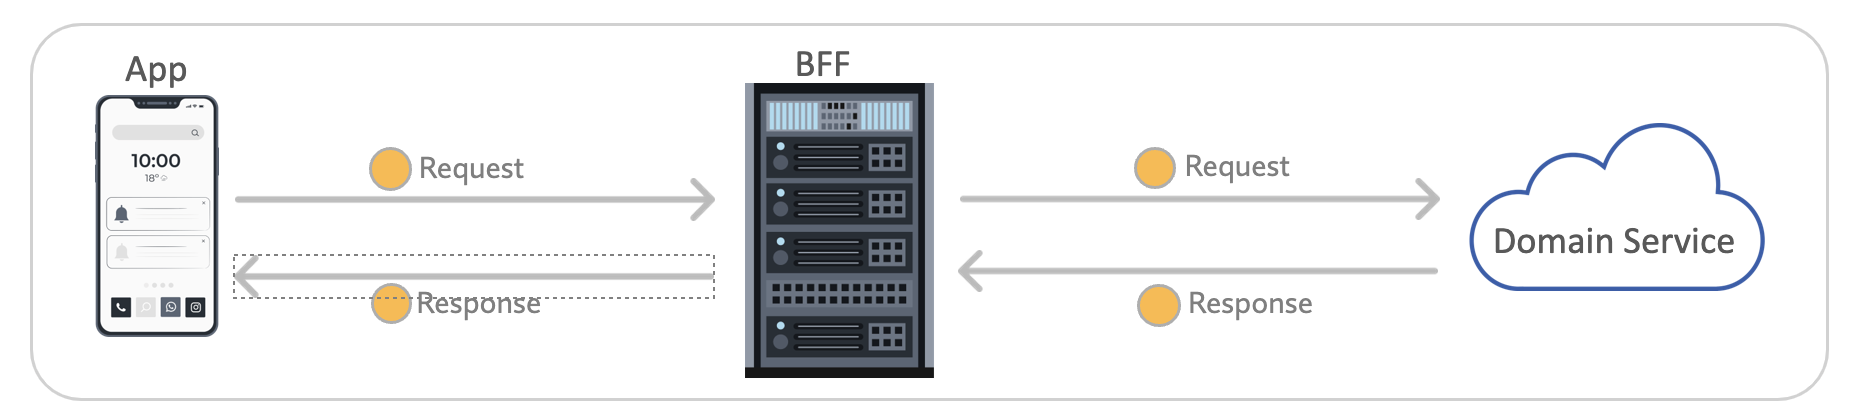
In this architecture:
- The App represents the client application (e.g., a mobile app or web frontend)
- The BFF (Backend-for-Frontend) acts as an intermediary, tailoring the API for specific client needs
- The Domain Service represents the core business logic and data management
We'll be working with two OpenAPI specifications:
order_bff.yaml: Implemented by the BFF service, this specification defines the API contract between clients (like the mobile app) and the BFF.order_api.yaml: Implemented by the Domain Service, this specification defines the API contract between the BFF and the Domain Service.
Step 1: Setting Up a Central Contract Repository
Setup overview
A central contract repository is useful for maintaining consistency across your API specifications and enabling effective contract testing.
If you already have a central contract repository, you can use that instead and skip to the next section.
Else you can refer to Central Contract Repository for an example of how to organize a central contract repo.
CI Pipeline Setup
Whenever any API specs or their examples are updated, the author should open a Pull Request (PR) or Merge Request (MR). When a PR/MR is raised, we need to set up a simple CI pipeline to perform the following actions:
- lint the specifications using the Specmatic linter
- validate if the inline and external examples are still valid according to the updated specification
- check backward compatibility of your contracts using Specmatic
- GitHub
- GitLab
name: Lint, Validate Examples and Check Backward Compatibility
on:
  push:
    branches:
      - main
  pull_request:
    branches:
      - main
jobs:
  build:
    runs-on: ubuntu-latest
    name: Check API Contracts
    steps:
      - uses: actions/checkout@v6
        with:
          fetch-depth: 0
      - name: Save Specmatic license
        run: |
          mkdir -p ~/.specmatic
          echo "${{ secrets.SPECMATIC_LICENSE_KEY }}" > ~/.specmatic/specmatic-license.txt
      - name: Run Specmatic linter on OpenAPI specs
        run: |
          docker run --rm \
            -v "$(pwd):/usr/src/app" \
            -v "$HOME/.specmatic:/root/.specmatic:ro" \
            -w /usr/src/app \
            specmatic/enterprise \
            lint 'io/specmatic/examples/store/openapi/*.yaml'
      - name: Validate OpenAPI examples
        run: |
          docker run -v "$(pwd):/usr/src/app" \
            -v "$HOME/.specmatic:/root/.specmatic:ro" \
            specmatic/enterprise \
            examples validate --specs-dir=io/specmatic/examples/store/openapi
      - name: Run backward compatibility check
        env:
          SPECMATIC_LICENSE_CONTENT: ${{ secrets.SPECMATIC_LICENSE_KEY }}
        run: |
          docker run -v "$(pwd):/usr/src/app" \
            --user $(id -u):$(id -g) \
            -e SPECMATIC_LICENSE_CONTENT \
            specmatic/enterprise \
            backward-compatibility-check --base-branch=origin/main
      - name: Upload backward compatibility CTRF report
        uses: actions/upload-artifact@v6
        if: always()
        with:
          name: backward-compatibility-ctrf-report
          path: build/reports/specmatic/backward_compatibility/ctrf/*.json
      - name: Render backward compatibility CTRF report
        uses: ctrf-io/github-test-reporter@v1
        if: always()
        with:
          report-path: build/reports/specmatic/backward_compatibility/ctrf/*.json
stages:
  - lint
  - example_validation
  - compatibility
workflow:
  rules:
    - if: $CI_MERGE_REQUEST_TARGET_BRANCH_NAME == "main"
    - if: $CI_COMMIT_BRANCH == "main"
lint_openapi_files:
  stage: lint
  image:
    name: specmatic/enterprise
    entrypoint:
      - ""
  before_script:
    - mkdir -p ~/.specmatic && echo "$SPECMATIC_LICENSE_KEY" > ~/.specmatic/specmatic-license.txt
  script:
    - specmatic lint 'io/specmatic/examples/store/openapi/*.yaml'
validate_openapi_examples:
  stage: example_validation
  image:
    name: specmatic/enterprise
    entrypoint:
      - ""
  before_script:
    - mkdir -p ~/.specmatic && echo "$SPECMATIC_LICENSE_KEY" > ~/.specmatic/specmatic-license.txt
  script:
    - specmatic examples validate --specs-dir=io/specmatic/examples/store/openapi
compatibility:
  stage: compatibility
  image:
    name: specmatic/enterprise
    entrypoint:
      - ""
  variables:
    SPECMATIC_LICENSE_CONTENT: $SPECMATIC_LICENSE_KEY
  rules:
    - if: $CI_MERGE_REQUEST_TARGET_BRANCH_NAME == "main"
    - when: never
  before_script:
    - git fetch --unshallow || true
    - git fetch origin main
  script:
    - specmatic backward-compatibility-check --base-branch=origin/main
  artifacts:
    when: always
    paths:
      - build/reports/specmatic/backward_compatibility/ctrf/*.json
After successfully setting up your central contract repository and running the CI pipeline, you should see output similar to this:

Sample Central Contract Repository with Pre-merge checks
Here are some sample pre-merge pipelines to disallow merges when specification changes have linter errors or backward incompatible (breaking) changes.
Step 2: Setting up Client, Provider and Domain services
Now that we have our API specifications checked in, let's bring our Order services to life!
Client - You can implement the client in the programming language of your choice. Once ready, place the following configuration in a file named specmatic.yaml at the root level of your project. This will:
- Virtualize the BFF service for the client application (based on the
order_bff.yamlcontract), helping to isolate the client.
- specmatic.yaml
- specmatic.json
version: 3
dependencies:
  services:
    - service:
        $ref: "#/components/services/(name-of-dependency-service)"
components:
  sources:
    gitSource:
      git:
        url: (your-git-repository)
  services:
    (name-of-dependency-service):
      description: (description-of-dependency-service)
      definitions:
        - definition:
            source:
              $ref: "#/components/sources/gitSource"
            specs:
              - (path-to-your-spec-in-git/order_bff.yaml)
{
  "version": 3,
  "dependencies": {
    "services": [
      {
        "service": {
          "$ref": "#/components/services/(name-of-dependency-service)"
        }
      }
    ]
  },
  "components": {
    "sources": {
      "gitSource": {
        "git": {
          "url": "(your-git-repository)"
        }
      }
    },
    "services": {
      "(name-of-dependency-service)": {
        "description": "(description-of-dependency-service)",
        "definitions": [
          {
            "definition": {
              "source": {
                "$ref": "#/components/sources/gitSource"
              },
              "specs": [
                "(path-to-your-spec-in-git/order_bff.yaml)"
              ]
            }
          }
        ]
      }
    }
  }
}
BFF Service - Implement the BFF service in the language of your choice. Once ready, place the following configuration in a file named specmatic.yaml at the root level of your project. This will:
- Virtualize the Domain API service for the BFF application (based on the
order_api.yamlcontract) - Test the BFF service as a client (using the
order_bff.yamlcontract)
- specmatic.yaml
- specmatic.json
version: 3
dependencies:
  services:
    - service:
        $ref: "#/components/services/(name-of-dependency-service)"
systemUnderTest:
  service:
    $ref: "#/components/services/(name-of-service-under-test)"
components:
  sources:
    gitSource:
      git:
        url: (your-git-repository)
  services:
    (name-of-dependency-service):
      description: (description-of-dependency-service)
      definitions:
        - definition:
            source:
              $ref: "#/components/sources/gitSource"
            specs:
              - (path-to-your-spec-in-git/order_api.yaml)
    (name-of-service-under-test):
      description: (description-of-service-under-test)
      definitions:
        - definition:
            source:
              $ref: "#/components/sources/gitSource"
            specs:
              - (path-to-your-spec-in-git/order_bff.yaml)
{
  "version": 3,
  "dependencies": {
    "services": [
      {
        "service": {
          "$ref": "#/components/services/(name-of-dependency-service)"
        }
      }
    ]
  },
  "systemUnderTest": {
    "service": {
      "$ref": "#/components/services/(name-of-service-under-test)"
    }
  },
  "components": {
    "sources": {
      "gitSource": {
        "git": {
          "url": "(your-git-repository)"
        }
      }
    },
    "services": {
      "(name-of-dependency-service)": {
        "description": "(description-of-dependency-service)",
        "definitions": [
          {
            "definition": {
              "source": {
                "$ref": "#/components/sources/gitSource"
              },
              "specs": [
                "(path-to-your-spec-in-git/order_api.yaml)"
              ]
            }
          }
        ]
      },
      "(name-of-service-under-test)": {
        "description": "(description-of-service-under-test)",
        "definitions": [
          {
            "definition": {
              "source": {
                "$ref": "#/components/sources/gitSource"
              },
              "specs": [
                "(path-to-your-spec-in-git/order_bff.yaml)"
              ]
            }
          }
        ]
      }
    }
  }
}
Domain Service - After implementing domain service, place the following configuration in a file named specmatic.yaml at the root level of your project. This will test the domain API based on the order_api.yaml contract.
- specmatic.yaml
- specmatic.json
version: 3
systemUnderTest:
  service:
    $ref: "#/components/services/(name-of-service-under-test)"
components:
  sources:
    gitSource:
      git:
        url: (your-git-repository)
  services:
    (name-of-service-under-test):
      description: (description-of-service-under-test)
      definitions:
        - definition:
            source:
              $ref: "#/components/sources/gitSource"
            specs:
              - (path-to-your-spec-in-git/order_api.yaml)
{
  "version": 3,
  "systemUnderTest": {
    "service": {
      "$ref": "#/components/services/(name-of-service-under-test)"
    }
  },
  "components": {
    "sources": {
      "gitSource": {
        "git": {
          "url": "(your-git-repository)"
        }
      }
    },
    "services": {
      "(name-of-service-under-test)": {
        "description": "(description-of-service-under-test)",
        "definitions": [
          {
            "definition": {
              "source": {
                "$ref": "#/components/sources/gitSource"
              },
              "specs": [
                "(path-to-your-spec-in-git/order_api.yaml)"
              ]
            }
          }
        ]
      }
    }
  }
}
Step 2.1: Setting Up CI pipeline for client
After the client is up and running and checked into a Git repository, you can create the following CI pipeline to:
- Build the client app
- Virtualize the BFF service using
order_bff.yamland the Specmatic Docker image - Test the client implementation against the virtualized BFF service
(note: we implemented the client in react, so setting up pipeline accordingly)
PR Build Pipeline for Client Application
- GitHub
- GitLab
name: Client CI Build using Specmatic Serivce Virtualization
on:
  push:
    branches:
      - main
  pull_request:
    branches:
      - main
jobs:
  test:
    runs-on: ubuntu-latest
    steps:
      - uses: actions/checkout@v6
      - name: Use Node.js
        uses: actions/setup-node@v6
        with:
          node-version: lts
      - name: Install dependencies
        run: npm ci
      - name: Run Specmatic stub to virtualize the BFF service
        run: |
          docker run -d \
            -v ${{ github.workspace }}/specmatic.yaml:/usr/src/app/specmatic.yaml \
            -v ${{ github.workspace }}/build/reports/specmatic:/usr/src/app/build/reports/specmatic \
            -p 8080:8080 \
            specmatic/specmatic mock

          # Wait for the stub to be ready
          sleep 10
      - name: Run component test against the Specmatic stub
        run: npm run test:component
        env:
          STUB_URL: http://localhost:8080
stages:
  - test
workflow:
  rules:
    - if: $CI_MERGE_REQUEST_TARGET_BRANCH_NAME == "main"
    - if: $CI_COMMIT_BRANCH == "main"
client_component_tests:
  stage: test
  image:
    name: specmatic/specmatic:latest
    entrypoint:
      - ""
  before_script:
    - apk add -U nodejs
    - node --version
    - npm --version
  script:
    - npm ci
    - specmatic mock --port=8080 &
    - sleep 10
    - STUB_URL=http://localhost:8080 npm run test:component
Upon successful execution of the client CI pipeline, you should see output resembling this:
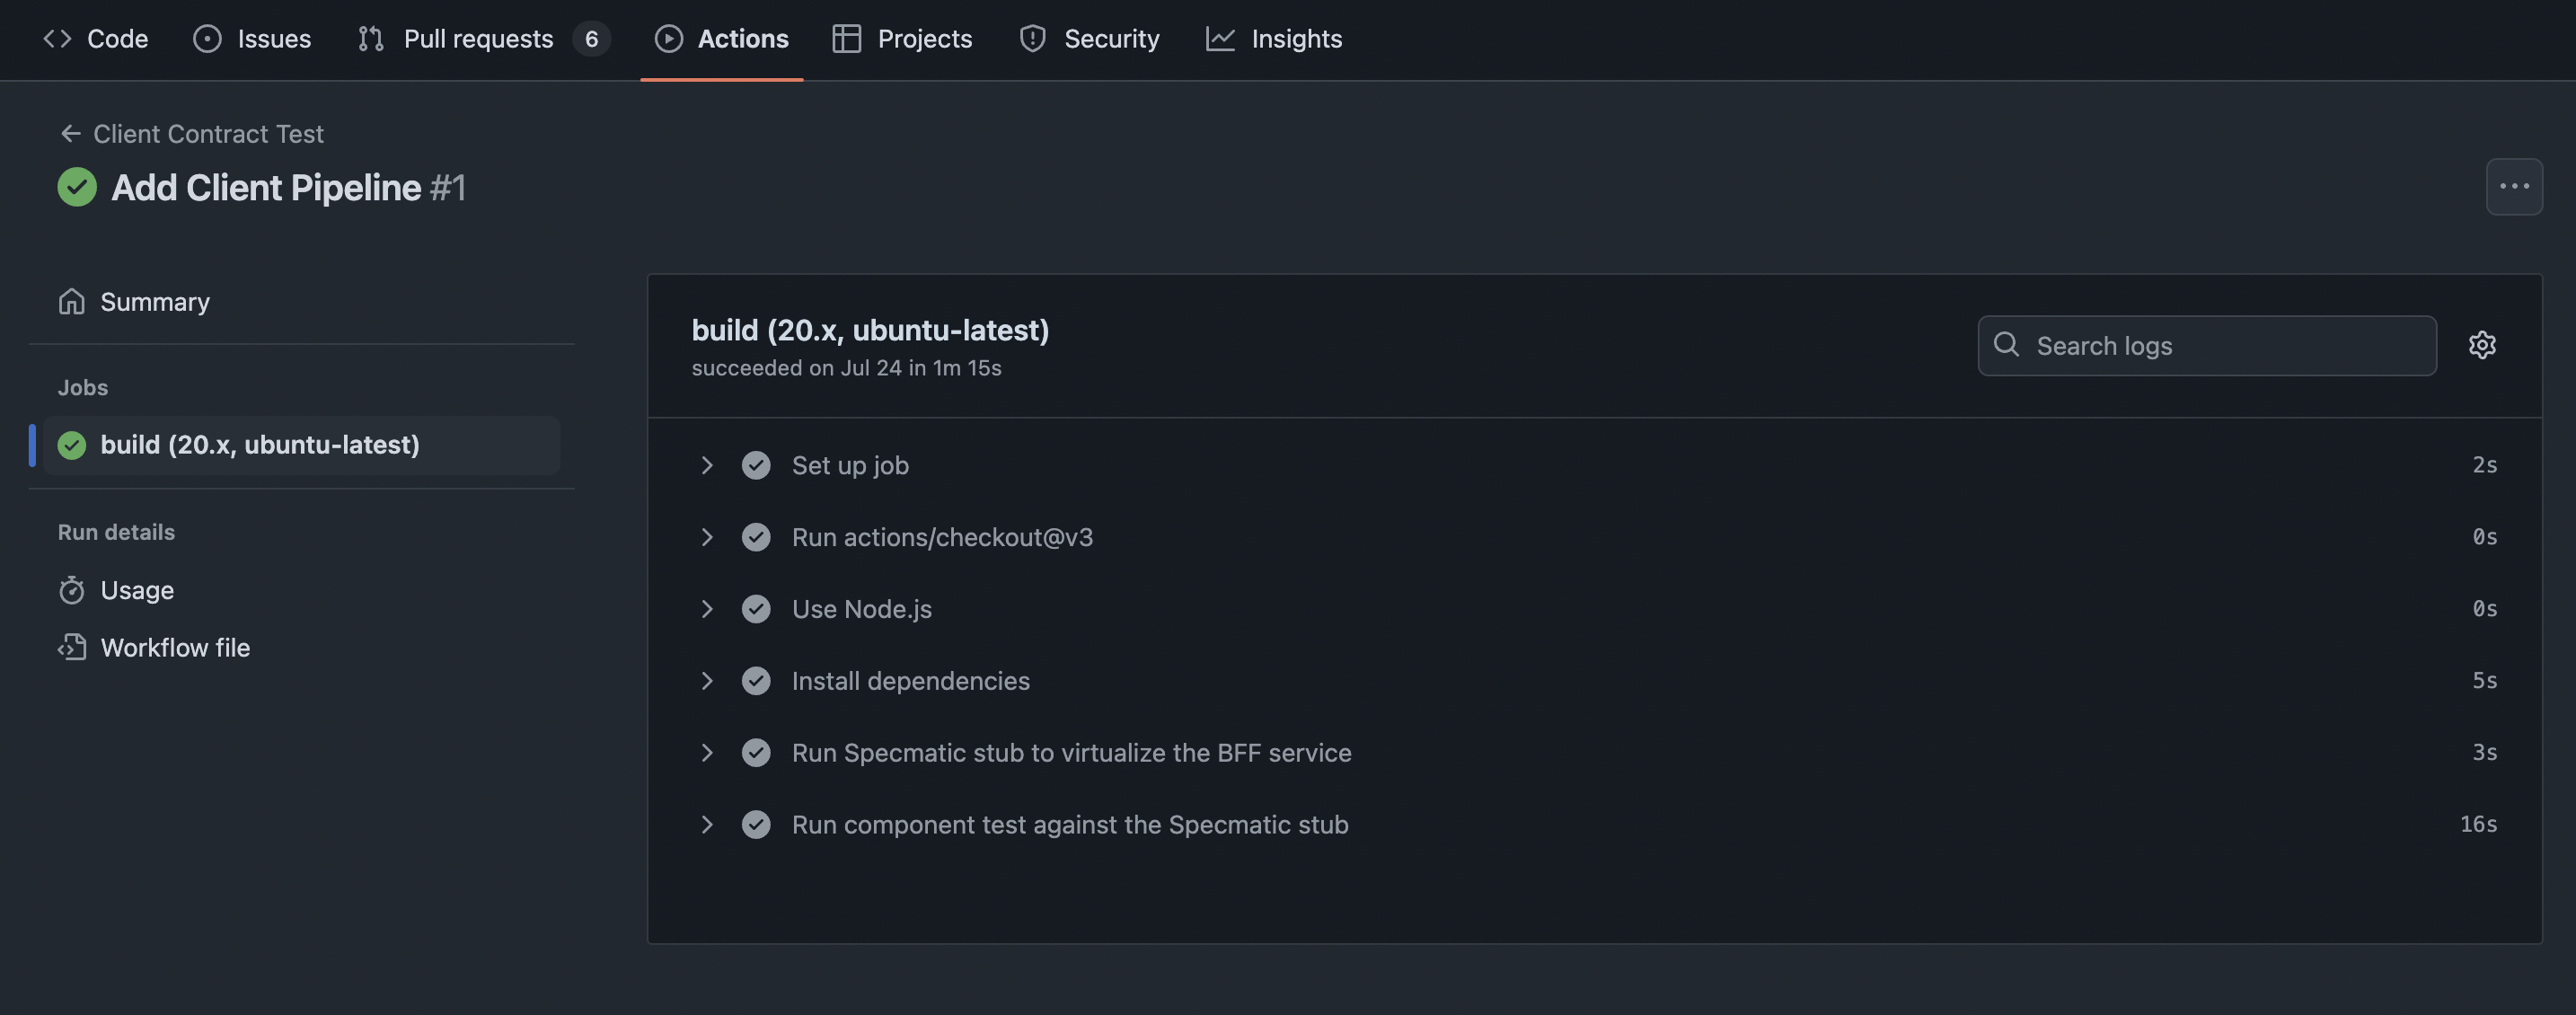
Also, you can see our sample client build report on GitHub
Step 2.2: Setting up CI pipeline for BFF Service
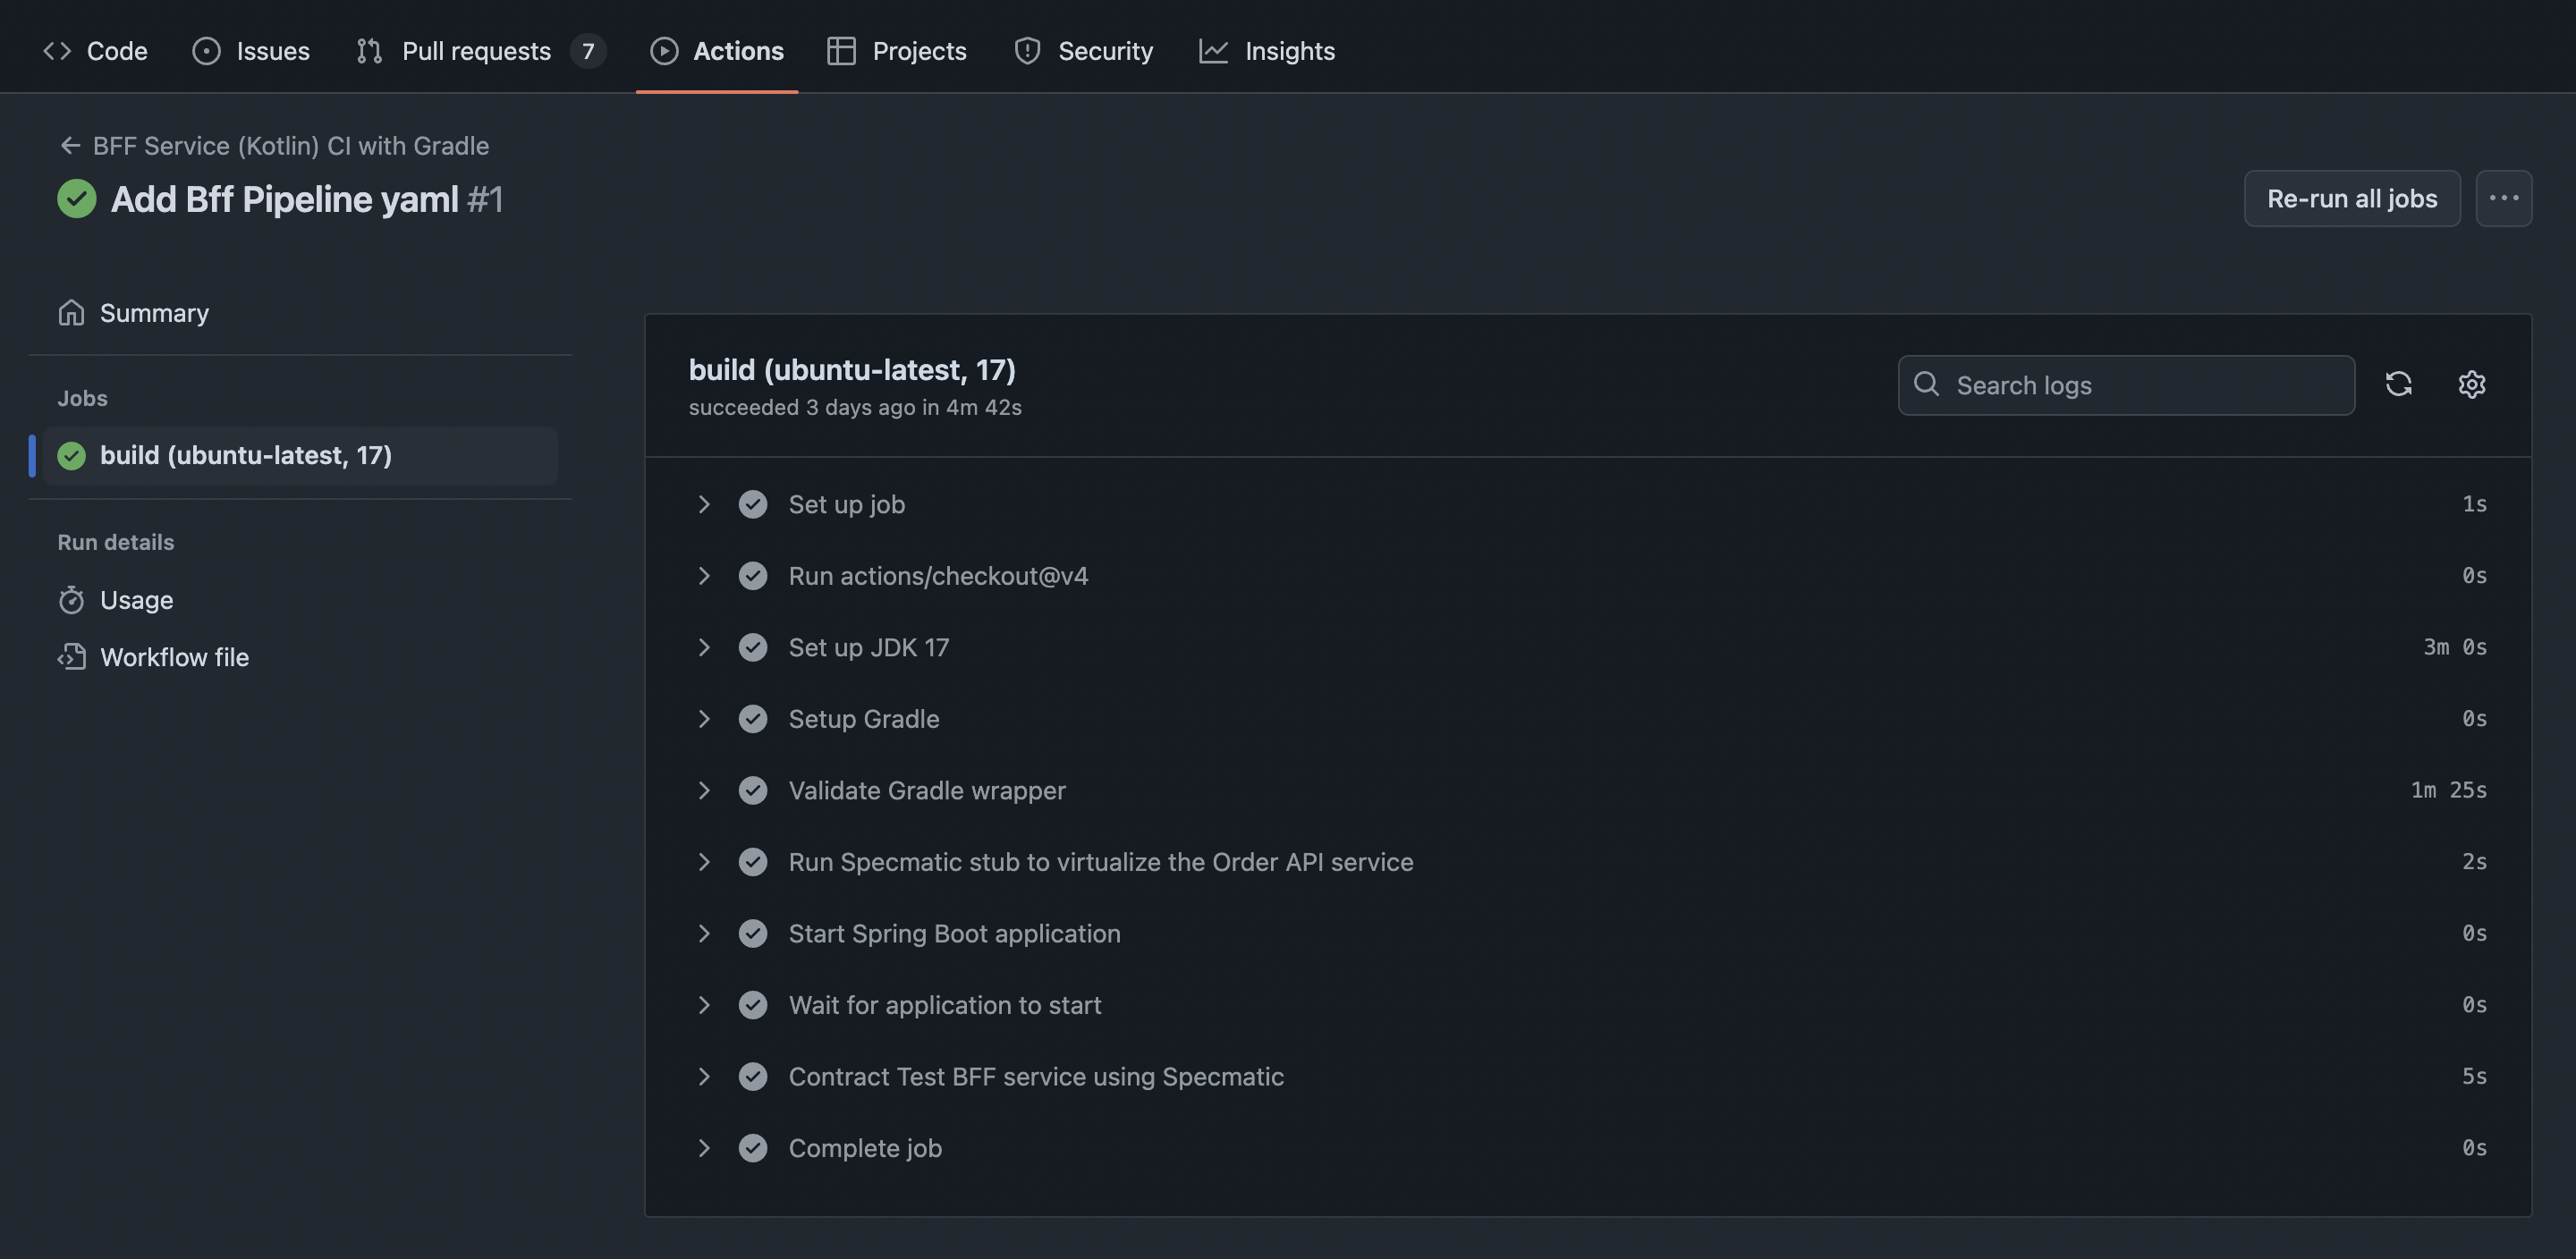
Make sure the BFF service is checked into a Git repository. Then create the following CI pipeline to:
- Build the BFF service
- Virtualize the Domain service using
order_api.yamland the Specmatic Docker image - Test the BFF service using
order_bff.yamland the Specmatic Docker image
(note: we implemented the BFF service in Kotlin, so setting up pipeline accordingly)
- GitHub Specmatic JUnitTest Helper
- GitHub Specmatic Docker
- GitLab
name: Provider and Consumer CI Build using Specmatic Contract Test and Service Virtualization
on:
  push:
    branches:
      - main
  pull_request:
    branches:
      - main
jobs:
  build:
    runs-on: ubuntu-latest
    steps:
      - uses: actions/checkout@v6
      - name: Set up JDK 17
        uses: actions/setup-java@v5
        with:
          distribution: temurin
          java-version: 17
      - name: Run Specmatic Contract Tests using JUnit helper which in-turn starts SpringBoot app and Specmatic stubs
        run: ./gradlew test
name: Provider and Consumer CI Build using Specmatic Contract Test and Service Virtualization
on:
  push:
    branches:
      - main
  pull_request:
    branches:
      - main
jobs:
  build:
    runs-on: ubuntu-latest
    steps:
      - uses: actions/checkout@v6
      - name: Set up JDK 17
        uses: actions/setup-java@v5
        with:
          distribution: temurin
          java-version: 17
      - name: Run Specmatic stub to virtualize the Order API service
        run: |
          docker run -d \
            -v ${{ github.workspace }}/specmatic.yaml:/usr/src/app/specmatic.yaml \
            -v ${{ github.workspace }}/build/reports/specmatic:/usr/src/app/build/reports/specmatic \
            -p 9000:9000 \
            specmatic/specmatic mock

          # Wait for the stub to be ready
          sleep 10
      - name: Start Spring Boot application
        run: ./gradlew bootRun &
      - name: Wait for application to start
        run: sleep 30
      - name: Contract Test BFF service using Specmatic
        run: |
          docker run \
            -v ${{ github.workspace }}/specmatic.yaml:/usr/src/app/specmatic.yaml \
            -v ${{ github.workspace }}/build/reports/specmatic:/usr/src/app/build/reports/specmatic \
            --network=host \
            specmatic/specmatic test \
            --port=8080 \
            --host=localhost
stages:
  - test
workflow:
  rules:
    - if: $CI_MERGE_REQUEST_TARGET_BRANCH_NAME == "main"
    - if: $CI_COMMIT_BRANCH == "main"
provider_contract_tests:
  stage: test
  image: eclipse-temurin:17-jdk gradle
  script:
    - ./gradlew test
After running the BFF service CI pipeline, you should see results similar to:
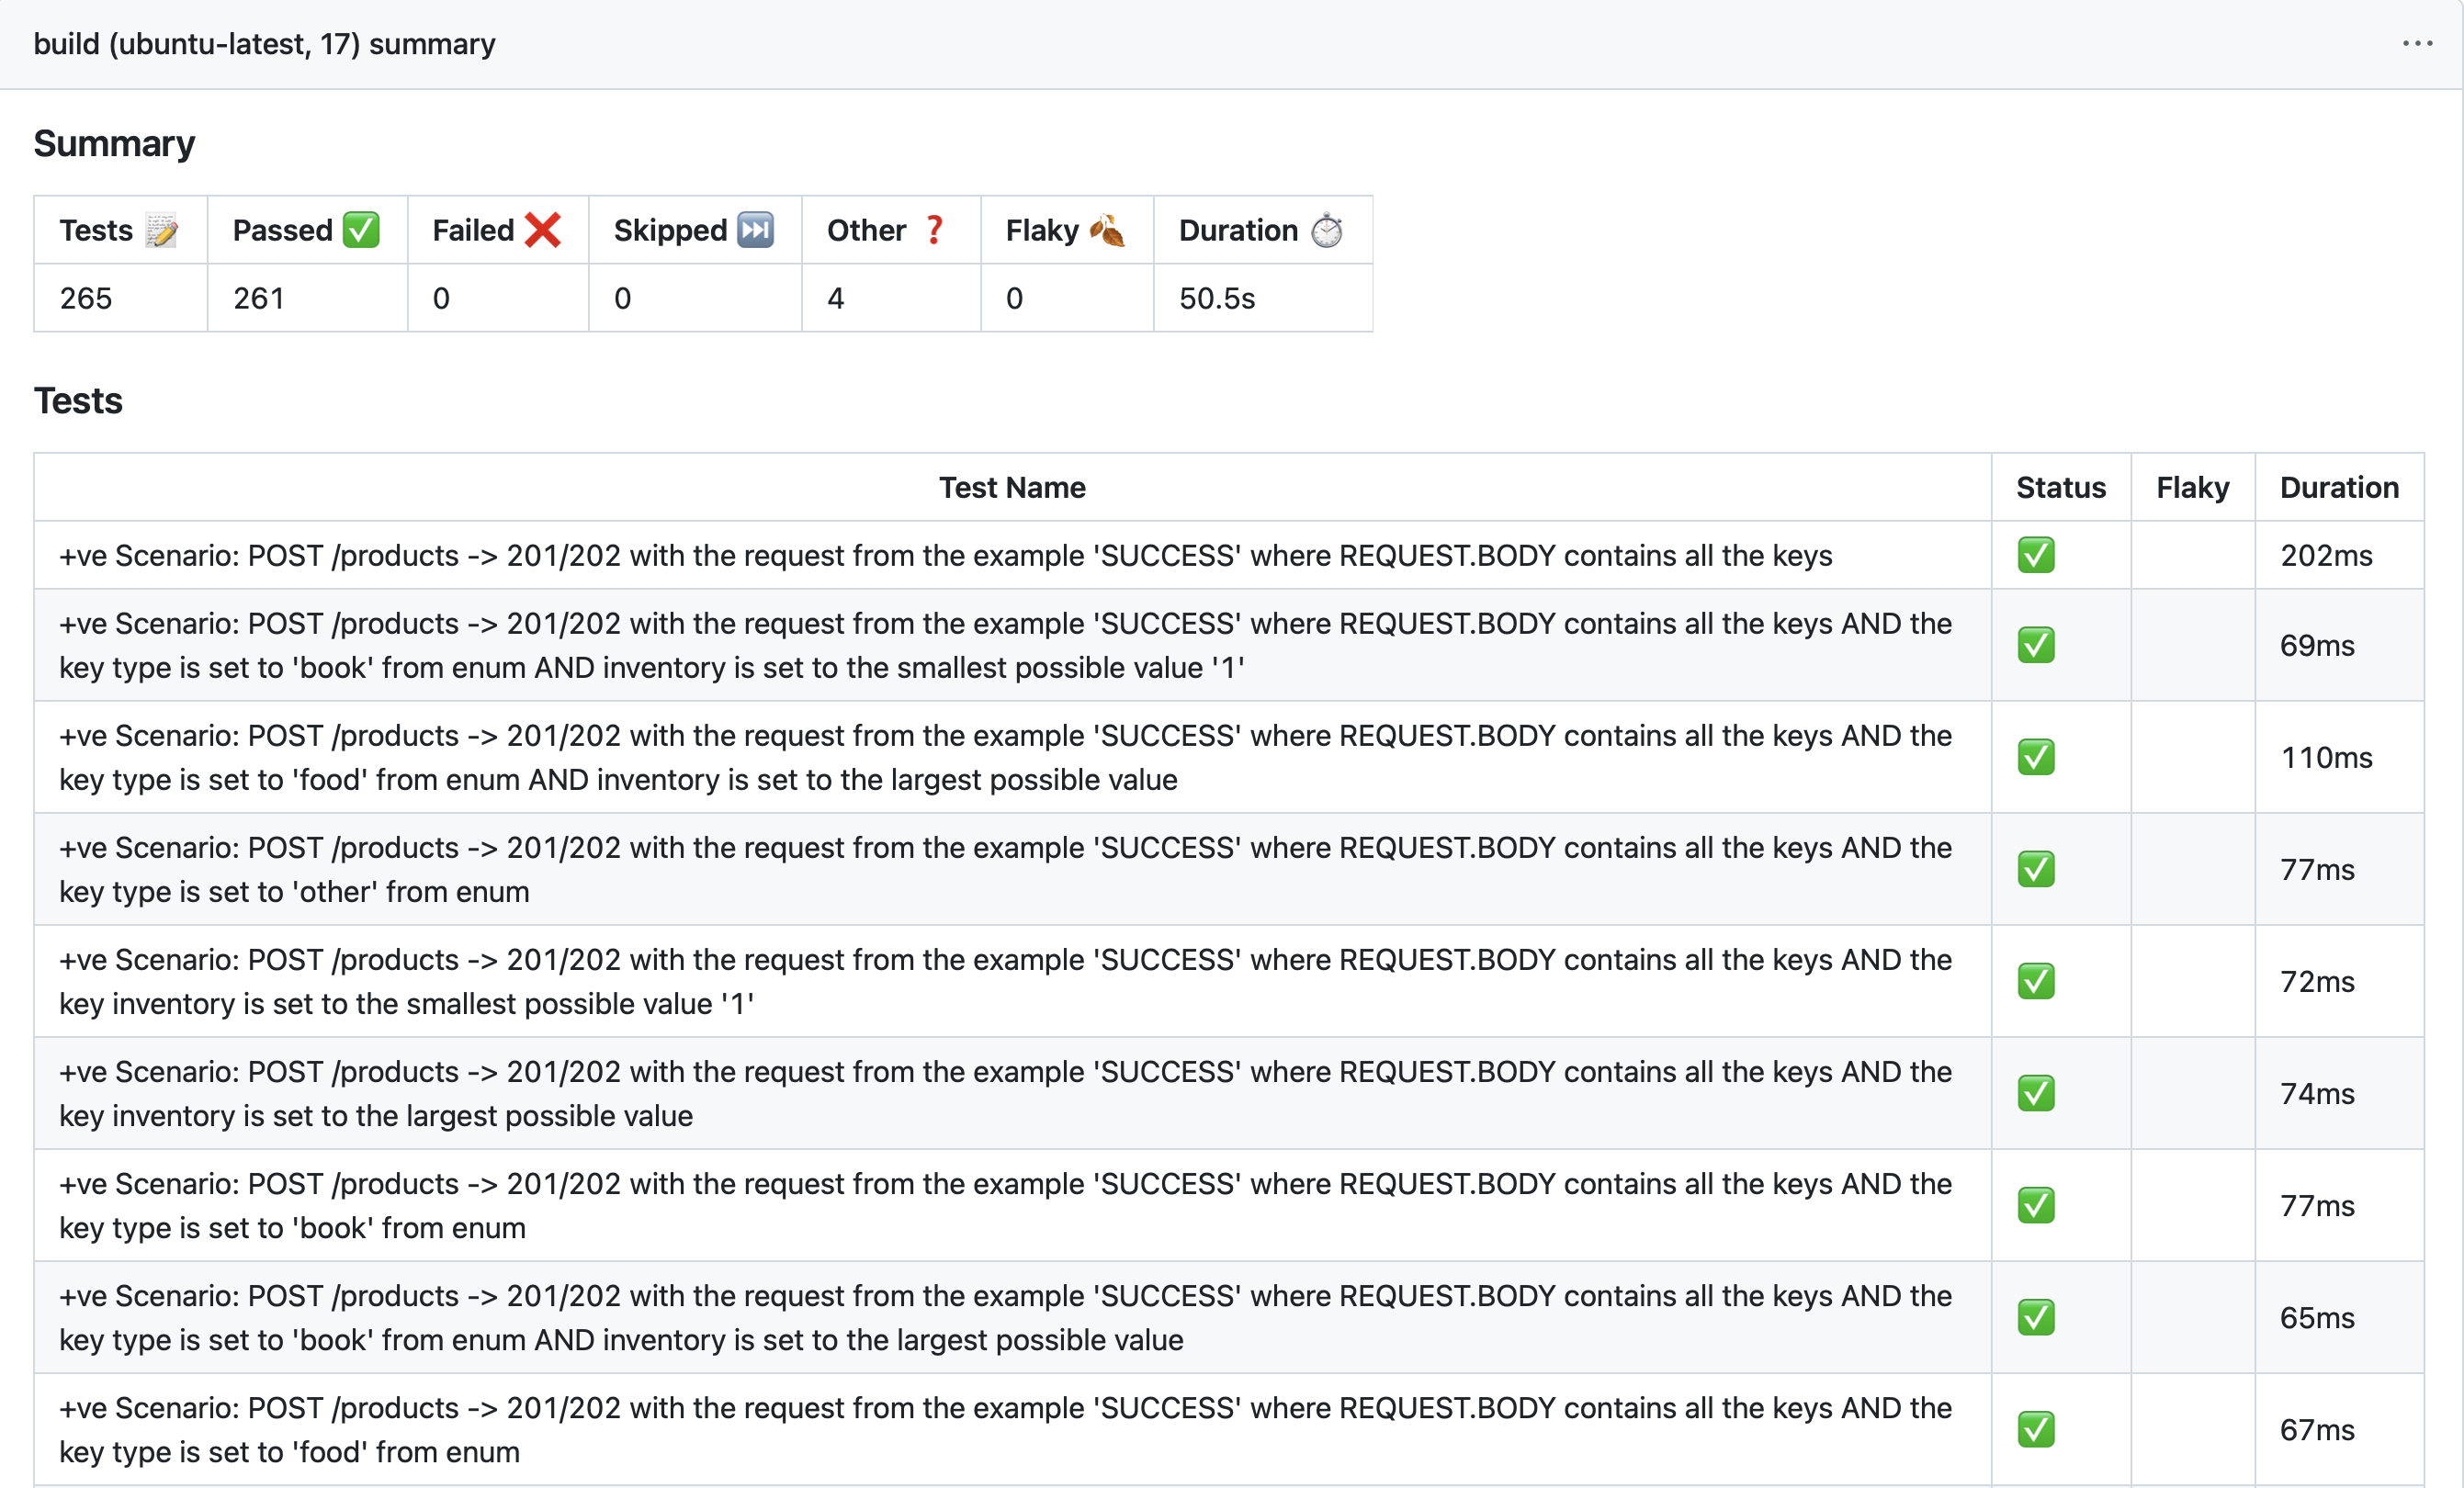
Specmatic also supports CTRF reports for standardized reporting of the contract tests. To enable CTRF reports, please use the following CI workflow:
- GitHub CTRF - Delta
- GitHub Specmatic with CTRF Report
jobs:
  build:
    runs-on: ubuntu-latest
    env:
      CTRF_REPORT_PATH: ./build/reports/specmatic/test/ctrf/*.json
    steps:
      - name: Save Specmatic license
        run: |
          mkdir -p ~/.specmatic
          echo "${{ secrets.SPECMATIC_LICENSE_KEY }}" > ~/.specmatic/specmatic-license.txt
      - name: Upload CTRF Report
        uses: actions/upload-artifact@v6
        if: always()
        with:
          name: ctrf-report
          path: ${{ env.CTRF_REPORT_PATH }}
          retention-days: 5
      - name: Publish Test Results in CTRF format
        uses: ctrf-io/github-test-reporter@v1
        if: always()
        with:
          report-path: ${{ env.CTRF_REPORT_PATH }}
      - name: Upload HTML Test Report
        uses: actions/upload-artifact@v6
        with:
          name: specmatic-html-report
          path: ./build/reports/specmatic/test/html
name: Provider and Consumer CI Build with CTRF Report
on:
  push:
    branches:
      - main
  pull_request:
    branches:
      - main
jobs:
  build:
    runs-on: ubuntu-latest
    env:
      CTRF_REPORT_PATH: ./build/reports/specmatic/test/ctrf/*.json
    steps:
      - uses: actions/checkout@v6
      - name: Set up JDK 17
        uses: actions/setup-java@v5
        with:
          distribution: temurin
          java-version: 17
      - name: Save Specmatic license
        run: |
          mkdir -p ~/.specmatic
          echo "${{ secrets.SPECMATIC_LICENSE_KEY }}" > ~/.specmatic/specmatic-license.txt
      - name: Run Specmatic stub to virtualize the Order API service
        run: |
          docker run -d \
            -v ${{ github.workspace }}/specmatic.yaml:/usr/src/app/specmatic.yaml \
            -v ${{ github.workspace }}/build/reports/specmatic:/usr/src/app/build/reports/specmatic \
            -p 9000:9000 \
            specmatic/enterprise stub

          # Wait for the stub to be ready
          sleep 10
      - name: Start Spring Boot application
        run: ./gradlew bootRun &
      - name: Wait for application to start
        run: sleep 30
      - name: Contract Test BFF service using Specmatic
        run: |
          docker run \
            -v ${{ github.workspace }}/specmatic.yaml:/usr/src/app/specmatic.yaml \
            -v ${{ github.workspace }}/build/reports/specmatic:/usr/src/app/build/reports/specmatic \
            --network=host \
             specmatic/enterprise test \
            --port=8080 \
            --host=localhost
      - name: Upload CTRF Report
        uses: actions/upload-artifact@v6
        if: always()
        with:
          name: ctrf-report
          path: ${{ env.CTRF_REPORT_PATH }}
          retention-days: 5
      - name: Publish Test Results in CTRF format
        uses: ctrf-io/github-test-reporter@v1
        if: always()
        with:
          report-path: ${{ env.CTRF_REPORT_PATH }}
      - name: Upload HTML Test Report
        uses: actions/upload-artifact@v6
        with:
          name: specmatic-html-report
          path: ./build/reports/specmatic/test/html
On successful completion of the BFF CI pipeline, you should see CTRF Report like this:
Also, you can see our sample BFF build report on GitHub
Step 2.3: Setting up CI pipeline for Order API
Make sure Order Domain API service is checked in to a git repository. Then create the following CI pipeline to :
- build the Domain API service
- test Domain API service using
order_api.yamland Specmatic docker image.
(note: we implemented the Order Domain API service in Kotlin, so setting up pipeline accordingly)
- GitHub
- GitLab
name: Domain API service CI Build using Specmatic Contract Test
on:
  push:
    branches:
      - main
  pull_request:
    branches:
      - main
jobs:
  build:
    runs-on: ubuntu-latest
    steps:
      - uses: actions/checkout@v6
      - name: Set up JDK 17
        uses: actions/setup-java@v5
        with:
          distribution: temurin
          java-version: "17"
      - name: Setup Maven Action
        uses: s4u/setup-maven-action@v1.19.0
      - name: Start Spring Boot application
        run: ./mvnw spring-boot:run &
      - name: Wait for application to start
        run: sleep 30
      - name: Contract Test Domain API service using Specmatic Docker image
        run: |
          docker run \
          -v "$(PWD)/specmatic.yaml:/usr/src/app/specmatic.yaml" \
          -v "$(PWD)/build/reports/specmatic:/usr/src/app/build/reports \
          --network=host \
          specmatic/specmatic test \
          --port=9000 \
          --host=localhost
stages:
  - test
workflow:
  rules:
    - if: $CI_MERGE_REQUEST_TARGET_BRANCH_NAME == "main"
    - if: $CI_COMMIT_BRANCH == "main"
domain_api_contract_tests:
  stage: test
  image:
    name: specmatic/specmatic:latest
    entrypoint:
      - ""
  before_script:
    - apk add -U openjdk-17-jdk maven
  script:
    - ./mvnw spring-boot:run &
    - sleep 30
    - specmatic test --port=9000 --host=localhost
Upon completion of the Order API CI pipeline, you should see output like this:
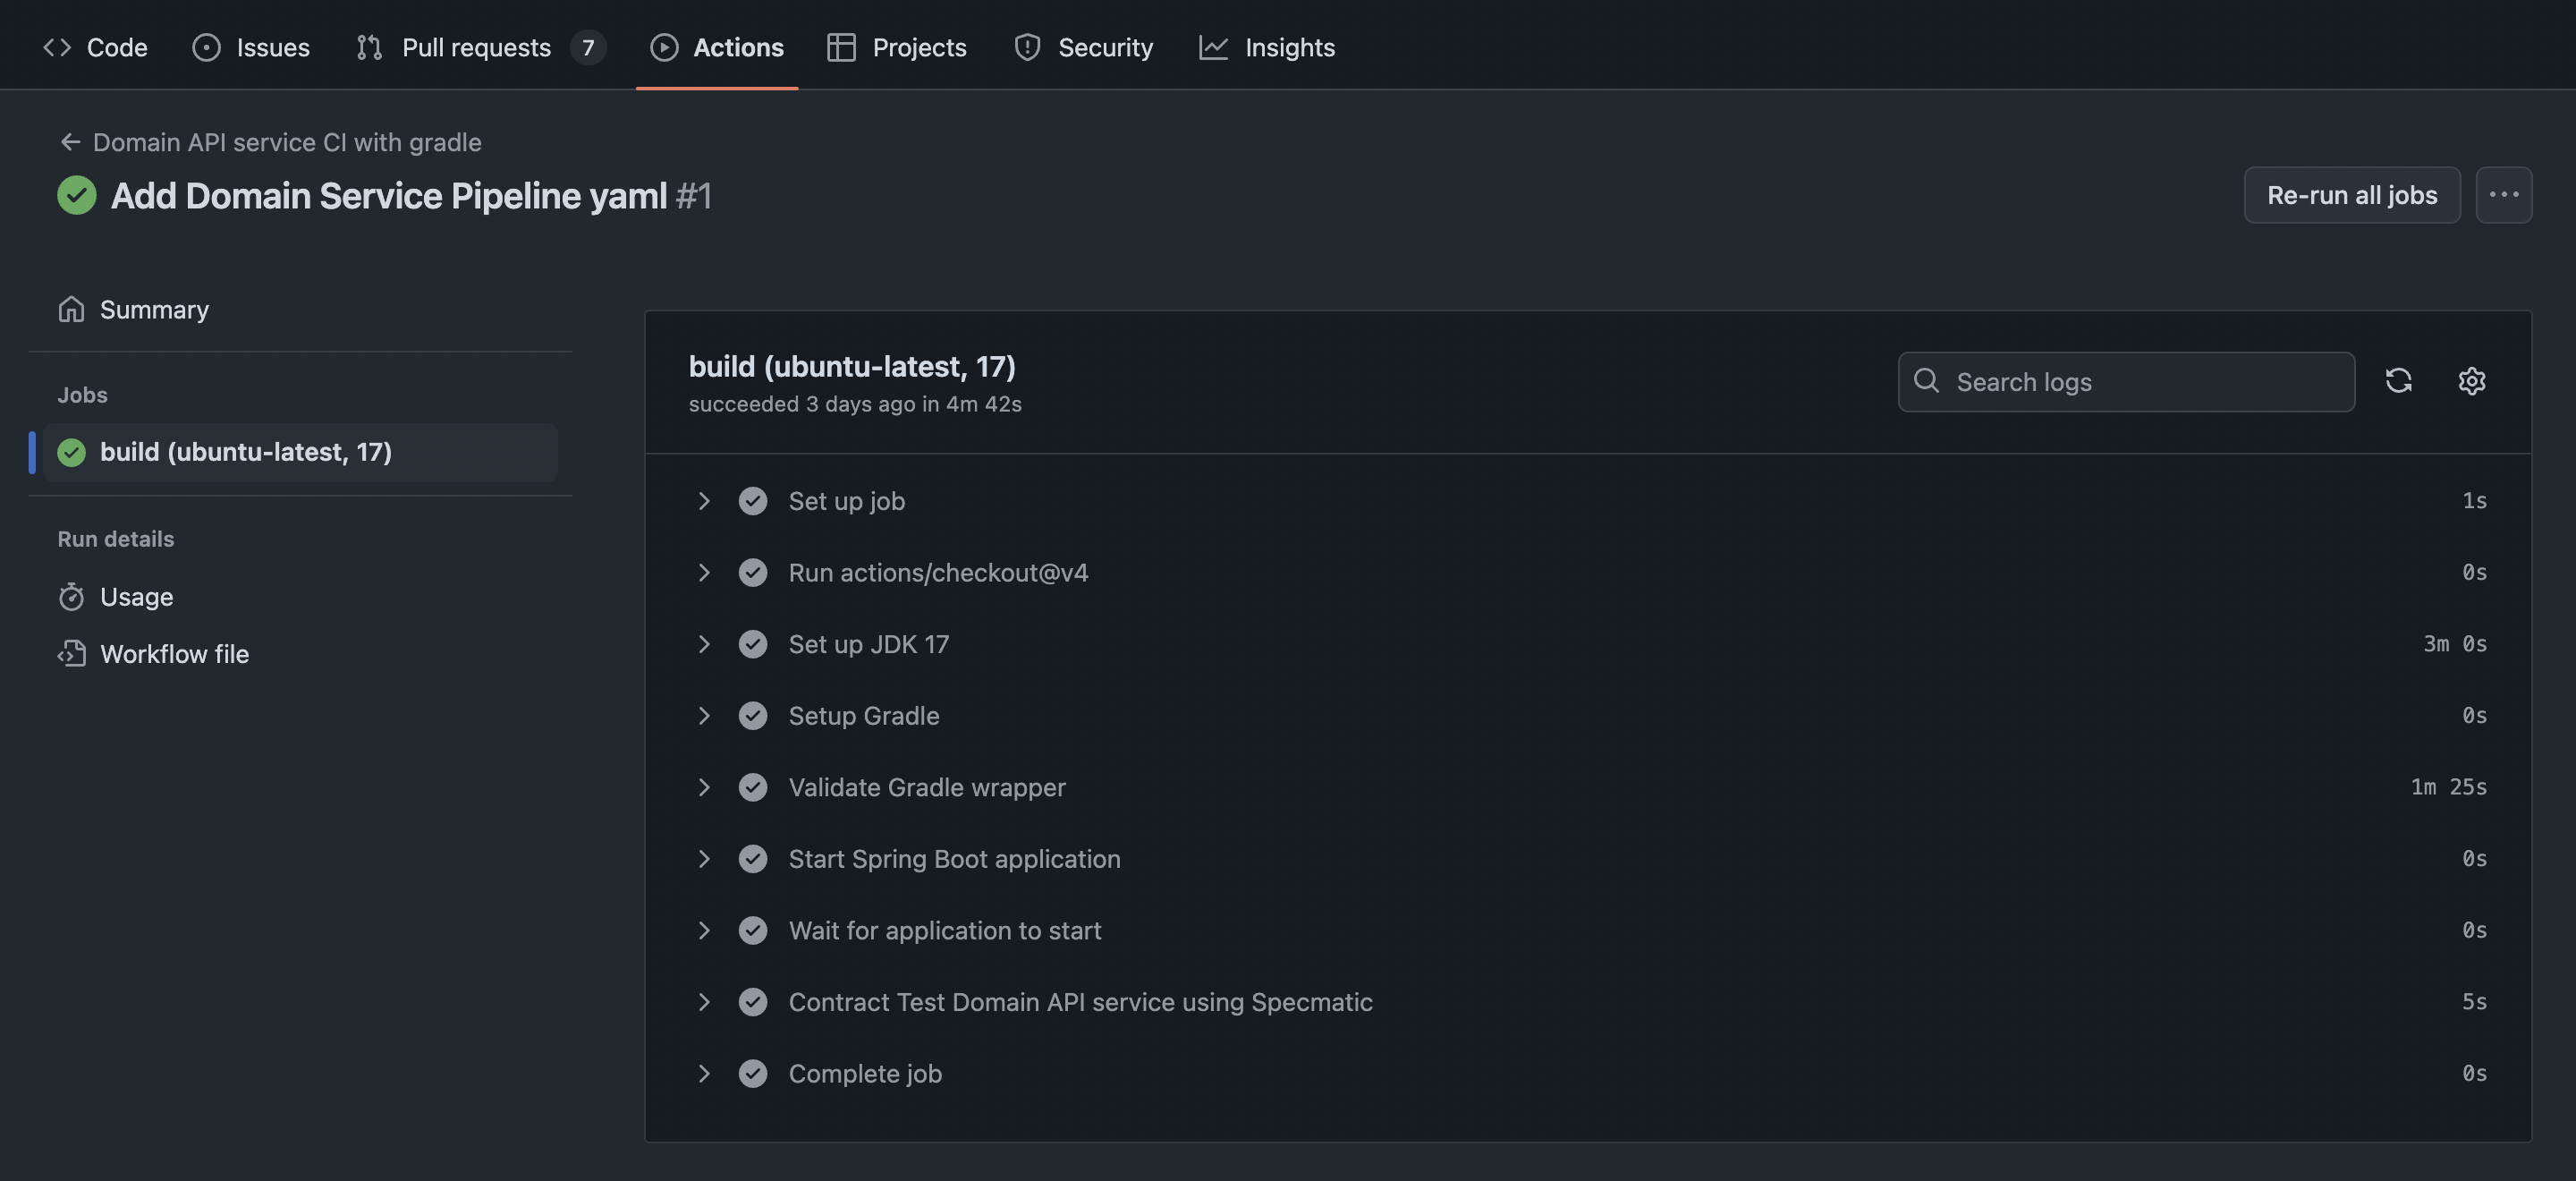
Also, you can see our sample Order API build report on GitHub
Summary of Progress
Congratulations! At this point, you have successfully set up and configured:
✅ Central contract repository with CI/CD for linting and backward compatibility checks
✅ Client application with CI/CD for building and testing against a virtualized BFF service
✅ BFF service with CI/CD for building, testing against a virtualized Domain service, and being tested as a provider
✅ Domain service with CI/CD for building and being tested as a provider
All four components are now integrated with Specmatic for contract testing and service virtualization. This setup ensures that your entire API ecosystem is continuously validated and maintains consistency across all services. With this foundation in place, you can now move on to configuring Specmatic Insights to visualize and analyze your API ecosystem.
Step 3: Visualizing Your API Ecosystem
If you are interested to:
- View your service dependency graph in real-time as your CI builds run
- Track CDD (Contract-Driven Development) adoption progress in your organization
- Identify dependencies between services
- Monitor API coverage and stub usage of your services
Please go through the detailed Specmatic Insights guide to integrate Specmatic Insights in your CI/CD pipelines.
Cloning API specifications from authenticated Central Contract Repositories
Specmatic requires appropriate auth setup in order to pull the latest API specifications to be used for both Contract Tests and Intelligent Service Virtualization. Here are the details.
Authentication params in Git Repo URI
This approach works across any CI setup which can include the auth params as part of the URI. Simply include your auth params (username/password, PAT and any other access tokens) as env variables (be sure to mask the values for security). Here is an example of Git repo URI in the Specmatic configuration file in this approach.
- specmatic.yaml
- specmatic.json
version: 3
components:
  sources:
    specmaticOrderContracts:
      git:
        url: https://${CENTRAL_CONTRACT_REPO_ACCESS_TOKEN}@github.com/specmatic/central-contract-repo-private.git
{
  "version": 3,
  "components": {
    "sources": {
      "specmaticOrderContracts": {
        "git": {
          "url": "https://${CENTRAL_CONTRACT_REPO_ACCESS_TOKEN}@github.com/specmatic/central-contract-repo-private.git"
        }
      }
    }
  }
}
As long as the env variables are available in the CI build machine (in this example CENTRAL_CONTRACT_REPO_ACCESS_TOKEN), Specmatic will evaluate them and execute Git clone on the fully evaluated URL.
A quick test to see if your Git Repo URI is correct will be to run a command line Git clone in your CI pipeline with it. If it works with command line Specmatic will also be able to use the same to clone your central contract repo to the CI build machine. Here are detailed examples.
GitLab
Examples:
- CI_JOB_TOKEN -
https://gitlab-ci-token:${CI_JOB_TOKEN}@gitlab.com/contract-testing/central-contract-repo.git/ - Username / Password -
https://${USERNAME}:${PASSWORD}@gitlab.com/contract-testing/central-contract-repo.git/
GitHub Actions
Examples:
- Personal Access Token -
https://${CENTRAL_CONTRACT_REPO_PAT}@github.com/specmatic/central-contract-repo-private.git
Detailed steps
- Set up a Personal Access Token in GitHub with "Read" access for contents on your Central Contract Repository (we recommend using fine-grained tokens)
- Add this PAT as a repo secret in your repository where Specmatic Contract Test / and or Service Virtualization is used. Example:
CENTRAL_CONTRACT_REPO_ACCESS_TOKEN=<your PAT> - In your GitHub workflow file, for steps involving Specmatic Contract Test and / or Service Virtualization, setup env variable
CENTRAL_CONTRACT_REPO_PATand set its value to the secret that we added above. Example:CENTRAL_CONTRACT_REPO_PAT: ${{ secrets.CENTRAL_CONTRACT_REPO_ACCESS_TOKEN }}. Here is a complete snippet.
- specmatic.yaml
- specmatic.json
version: 3
components:
  sources:
    specmaticOrderContracts:
      git:
        url: https://${CENTRAL_CONTRACT_REPO_ACCESS_TOKEN}@github.com/specmatic/central-contract-repo-private.git
{
  "version": 3,
  "components": {
    "sources": {
      "specmaticOrderContracts": {
        "git": {
          "url": "https://${CENTRAL_CONTRACT_REPO_ACCESS_TOKEN}@github.com/specmatic/central-contract-repo-private.git"
        }
      }
    }
  }
}
GitHub Actions
Note: We are in the process of standardizing on a uniform approach (Authentication params in Git Repo URI) across GitHub, GitLab, Azure and more. We suggest considering the steps listed here before going ahead with below technique. Below approach will also continue to be supported.
- Set up a Personal Access Token in GitHub with "Read" access for contents on your Central Contract Repository (we recommend using fine-grained tokens)
- Add this PAT as a repo secret in your repository where Specmatic Contract Test / and or Service Virtualization is used. Example:
CENTRAL_CONTRACT_REPO_ACCESS_TOKEN=<your PAT> - In your GitHub workflow file, for steps involving Specmatic Contract Test and / or Service Virtualization, setup env variable
CENTRAL_CONTRACT_REPO_ACCESS_TOKENand set its value to the secret that we added above. Example:CENTRAL_CONTRACT_REPO_ACCESS_TOKEN: ${{ secrets.CENTRAL_CONTRACT_REPO_ACCESS_TOKEN }}. Here is a complete snippet.
    - name: Build with Maven
      working-directory: main
      env:
        CENTRAL_CONTRACT_REPO_ACCESS_TOKEN: ${{ secrets.CENTRAL_CONTRACT_REPO_ACCESS_TOKEN }}
      run: mvn test package jacoco:report
- Then Specmatic automatically detects the presence of
CENTRAL_CONTRACT_REPO_ACCESS_TOKENenv variable and is able to clone the central contract repo to the CI server by leveraging the same.
Generic settings for any other CI setup
Featured utilities
GitHub action to set up specmatic environment
Setup specmatic environment by Serghei Iakovlev